If you are looking for quick and easy instructions on how to connect two tents together, then this blog post is perfect for you. I will cover 15 steps that will help ensure your tent set up goes smoothly.
Following these steps carefully will also help prevent injury or damage to the tents themselves. So what are you waiting for? Let’s get started.
Whether you’re connecting two tents together or creating a free-standing shelter, certain things are to consider.
Some standard techniques are buying tents designed to connect, zip, or binder clip the doors together, make a tarp hallway, and use a bigger canopy to contain part of a smaller tent.
Why Should You Connect Two Tents?
There are a few reasons you might want to connect two tents together. Maybe you are going camping with a large group of people and need more than one tent.
Or maybe you have an extra tent that you don’t know what to do with. Connecting two tents together can be a great way to save space and money.
Why Shouldn’t You Connect Two Tents?
There are a few reasons you might not want to connect two tents together. First, if the tents are not made for this purpose, they may not withstand the wind or rain.
Connecting two tents together can also make moving around and setting up more challenging.
Here are the step by step guide to connecting two tents:
If you’re looking for a way to increase your camping space and comfort, consider joining two tents together. Here are the steps you need to follow:
Step One: Choose the Right Tents
The first step is to choose suitable tents. Next, make sure that both tents are of similar size and shape. It won’t be easy to connect them correctly if they’re not.
Step Two: Set Up the Tents
Next, set up the tents in the desired location. Make sure that they’re facing each other correctly and that there is enough space between them for you to walk through.
Step Three: Connect the Tent Poles
The third step is to connect the tent poles. This can be tricky, so make sure you follow the instructions carefully.
Step Four: Thread the Tent Poles Through the Sleeves
Once the tent poles are connected, thread them through the sleeves on each tent. Again, make sure that they’re tight and secure before moving on to the next step.
Step Five: Peg the Tents to the Ground
Once the tent poles are in place, peg the tents to the ground using the provided stakes. Make sure that they’re secure before moving on to the next step.
Step Six: Connect the Flysheet
The sixth step is to connect the flysheet. This will provide extra protection from wind and rain.
Step Seven: Secure the Flysheet to the Tent
Next, secure the flysheet to the tent using the provided clips or straps. Again, make sure that it’s tight and secure before moving on to the next step.
Step Eight: Stake Down the Flysheet
Finally, stake down the flysheet using the provided stakes. Make sure that it’s secure before moving on to the next step.
Step Nine: Enjoy Your New Multi-Room Tent
Finally, enjoy your new multi-room tent. It’s perfect for groups or families who want more space and privacy. Plus, it’s ideal for all seasons, thanks to its extra ventilation and insulation.
Step Ten: If you are using a stove or campfire inside of your tent, make sure to keep it away from the walls and ceilings. This will help prevent any accidental fires or damage to the tents.
Step Eleven: Always check for overhead hazards before setting up your tents. These can include tree branches, power lines, and even satellites.
Step Twelve: Ensure that both tents are adequately anchored to the ground before using them in windy conditions. This can be done by using more stakes or attaching guy lines to heavier objects like rocks or logs.
Step Thirteen: If you are using a giant tent, it is often good to put it up first and then attach the smaller tents. This will help create a more stable structure.
Step Fourteen: To keep your tents in good condition, it is essential to store them when they are not correctly used. This can be done by folding them up according to the instructions or using a storage bag.
Step Fifteen: Always check the weather forecast before heading out on your next camping trip, and be prepared for all types of conditions. This will help ensure that you have a safe and enjoyable trip.
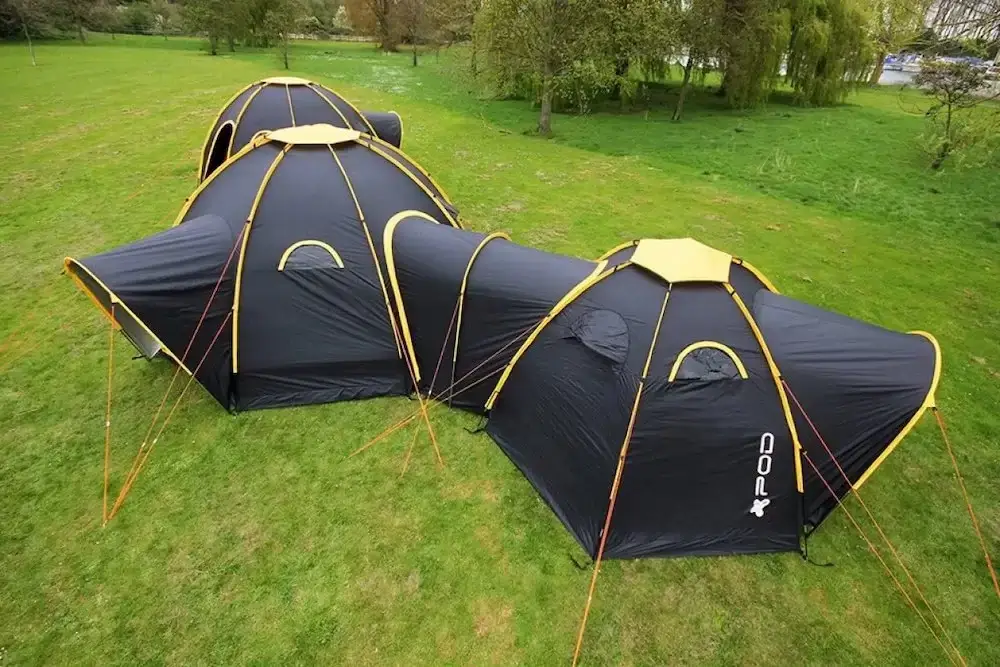
Multi-Room Tents

If you’re looking to create a multi-room camping experience, there are a few tents on the market that can help. These tents allow you to attach two (or more) tents, creating one ample living space.
This is perfect for larger groups or families who want to spread out while camping.
To connect two tents, you’ll need to purchase an attachment kit. This kit will include all necessary hardware (ropes, stakes, connectors) to connect the two tents. Follow these steps to attach your tents:
- Locate the connector points on each tent. The connector points are typically located at the roof or ceiling of the tent.
- Insert the connector stakes into the ground at each of the connector points. Make sure that the stakes are secure in the ground before moving on to the next step.
- Connect the ropes between each of the tents, making sure that they are taut. You may need someone to help you hold the tents in place while you connect the ropes.
- Connect the connectors at the top of each tent. This will secure the two tents together.
- Make any necessary adjustments to the ropes and stakes, ensuring that the tents are stable and secure.
That’s it. You’ve now connected your tents together and created one large living space.
Benefits of Multi-Room Tents
There are many benefits to using a multi-room tent. Multi-room tents offer more space and privacy, perfect for groups or families. They also provide extra ventilation and insulation, making them ideal for all seasons.
Additionally, multi-room tents are typically easier to set up than traditional single-room tents.
-Allows for more privacy and separation between groups
-Great for families or large groups
-Can create one large living space
-Tents are typically lightweight and easy to set up/takedown
-Ideal for all seasons
-Ventilation and insulation is better than traditional tents
15 Tips You MUST Follow to Connect Tents:
- Make sure that the two tents are compatible. Not all tents are created equal, so it is important to make sure that the tents you are trying to connect together can actually be connected.
- Determine the best spot to connect the two tents. You will want to find a flat piece of land where both tents can be set up. This will ensure that the tents are stable and won’t blow away in the wind.
- Layout both tents next to each other. Make sure that they are positioned correctly so that you will have enough room to walk between them once they are connected.
- Locate the connecting points on both tents. There should be a few different places on each tent where you can connect them together.
- Connect the two tents together using the appropriate straps, ropes, or clips. Be sure to follow the instructions that came with your tents to make sure that the connection is secure.
- Adjust the positioning of the tents so that they are even. You may need to move some of the stakes around or readjust the ropes in order to get them aligned correctly.
- Secure the tents together by staking them down. This will help keep them from blowing away in the wind and ensure that they stay connected throughout your trip.
- Test out the connection by walking between the tents. Make sure that it is sturdy and can hold your weight.
- Add any additional accessories to the tents, such as awnings or rain flys. This will help protect you from the elements and keep you dry during your trip.
- Enjoy your camping trip. Connecting two tents together can add an extra layer of convenience and comfort to your outdoor adventure.
- If you are having trouble connecting the tents, don’t be afraid to ask for help. There are plenty of experienced tent campers out there who would be happy to offer their advice.
- Be prepared for inclement weather. In some cases, it may be necessary to disconnect the tents in order to avoid damage from high winds or heavy rains.
- Make sure that you have all of the necessary supplies with you when connecting the tents together. This will help ensure a smooth and successful trip.
- Be patient and take your time when connecting the tents. This is not a process that should be rushed, so make sure to follow the steps carefully.
- Have fun. Connecting two tents together can add an extra level of excitement to your next camping trip. Enjoy the outdoors and create some memories with your friends or family.
Final Thought
If you’re looking for a way to connect two tents together, make sure you follow these 15 steps. By doing so, you’ll create a safe and secure connection that will keep you and your fellow campers comfortable during your outdoor adventure.
Now that you know how to connect two tents together, get out there and explore the great outdoors. Be sure to bring along your camping gear, and have a blast. Thanks for reading.
