If you’re a fisherman, you know how important it is to have a good fishing rod. Not only do you need the right equipment, but you also need to take care of your gear if you want it to last.
One of the most important parts of any fishing rod is the guide insert. This part helps direct the line and keep it from getting tangled.
If your guide insert is damaged or worn out, then it’s time to replace it. This blog post will show you how to replace fishing rod guide insert.
What is Fishing Rod Guide Insert?
Fishing Rod Guide Insert is the part of the fishing rod that helps direct how to replace the fishing rod guide insert.
It does this by allowing you to have more control over how your line moves through it and how it comes out on the other end when casting or reeling in a fish.
This small but important piece is often overlooked, and many fishermen end up having to replace their entire fishing rod if this part becomes damaged.
How Do I know If My Fishing Rod Guide Insert Is Damaged?
The easiest way to tell if your fishing rod guide insert needs replaced is by checking how it looks.
If it’s damaged, then there is a good chance that the line isn’t moving through it correctly, and your chances of landing a fish are significantly reduced.
Look for any cracks, chips, or splits in the guide insert, as these will need to be fixed before you can start fishing again.
Another way to tell if your guide insert needs replaced is how it sounds when casting or reeling in your line.
If you hear any rattling noises, then this means that something inside the guide insert has become loose and needs to be fixed immediately so as not to damage your fishing rod further.
While some may argue that these kinds of things happen naturally over time with extended use, others will say they are just signs that it’s time for a guide insert replacement.
How to Replace Fishing Rod Guide Insert
Now that you know how to identify whether or not your fishing rod guide insert needs replaced let’s look at how you can do just that.
The process is quite simple and only requires basic tools like pliers or wire cutters and some patience.
Materials needed:
- Fishing Rod
- Replacement Guide Insert
- Phillips Screwdriver
- Epoxy Glue or Superglue
- Light Source (optional)
- Heat Source (optional)
Steps for replacing fishing rod guide insert:
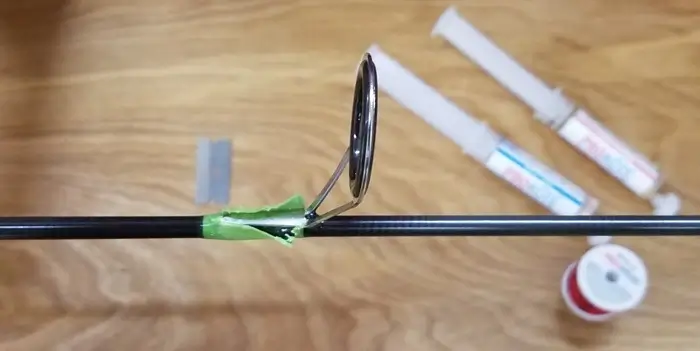
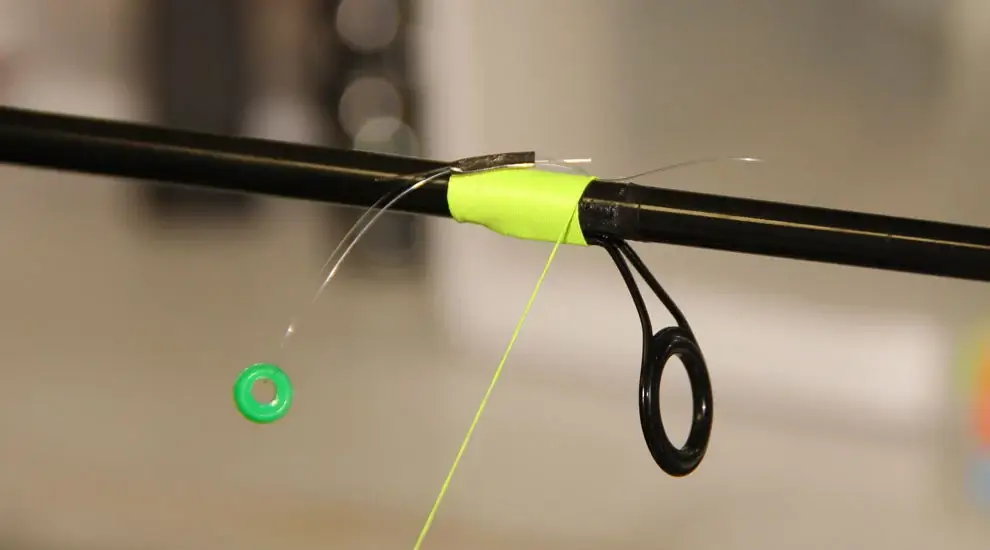
- First, remove the old guide insert by twisting it off of your fishing rod with pliers (or another tool). It may take a little bit of force, but once you get started they should come loose fairly easily.
- Next, take your new guide insert and place it over the old one so that you can see how it will fit onto the rod once installed (this step is important because some guides have different diameters than others).
- You may need to use pliers or wire cutters again if there are any tabs/hooks in the way during installation.
- After that, start twisting clockwise until you feel resistance or hear a snap indicating that everything has lined up properly and is secured in place.
- Just make sure not to twist too hard because this could cause damage to your fishing rod guide insert and render it useless before even having time for use.
- Lastly, test how your guide insert is working by casting and reeling in a line. If everything feels smooth and there are no more rattling noises, then congratulations – you have successfully replaced your fishing rod guide insert.
If you’re having any trouble following these steps or feel uncomfortable doing it yourself, don’t hesitate to take your gear to a professional for assistance.
They will be more than happy to help you out and get you back on the water in no time.
Now that you know how to replace your fishing rod guide insert, there’s no excuse not to do so when it becomes damaged.
Remember always to be safe and use caution while handling tools, especially if they are sharp. And most importantly, have fun out there and land that big one.
What Are the Tools Needed for Replacing a Fishing Rod Guide Insert?
To replace a fishing rod guide insert, you will need a few basic tools: a flathead screwdriver, pliers, and an awl. You may also find it helpful to have some scissors or wire cutters on hand.
If the old insert is still in good condition, you can use it as a model for cutting the new one. If the old insert is damaged or missing, you can use the measurements from the rod to cut a new one.
How to Remove the Old Guides from the Fishing Rod?
There are a few ways to remove the old guides from the fishing rod. You can use pliers, a screwdriver, or a knife. Be careful not to damage the rod when removing the guides.
The easiest way is to use pliers. First, grip the guide firmly and twist it until it comes loose. If the guide is stuck, use a screwdriver or knife to loosen it. Once the guide is loose, you can pull it out with your hands.
Do not use a knife if you are inexperienced with sharp objects because it can cause serious injury.
If the guides are glued in, you will need to use a solvent to remove them. Apply the solvent to the guide and let it soak in for a few minutes.
Then use a screwdriver or knife to pry the guide loose. Be careful not to damage the rod when removing the guides.
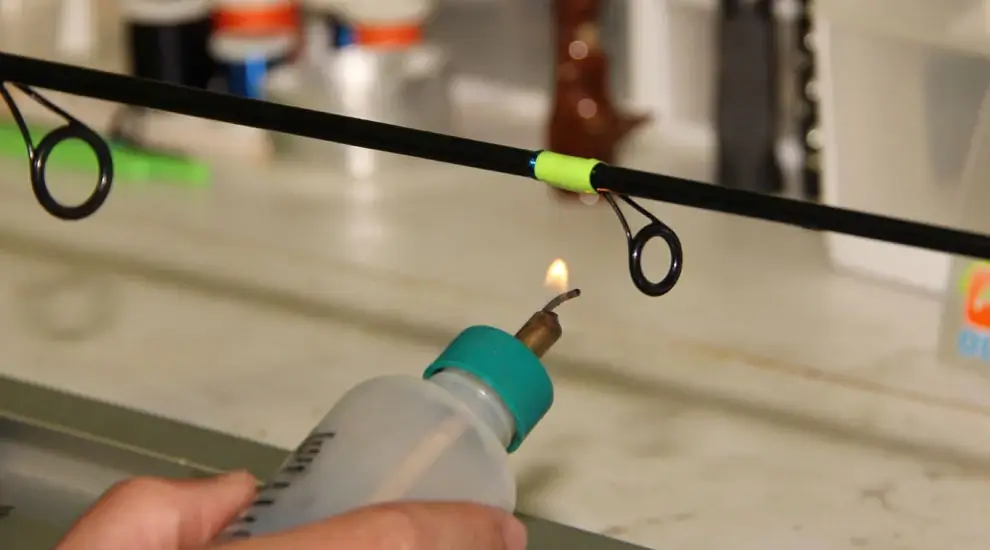
What Type of Glue Should I Use to Attach the New Guide Insert?
The two most common types of glue I use to attach new guide inserts are superglue and epoxy.
Epoxy is the strongest type of glue, but it requires more work and a longer wait time before you can start using your rod again.
Superglue dries quickly (takes only seconds), which makes it great for emergencies or if you need to replace a guide insert in a hurry.
The type of glue I use the most is superglue. I find that it dries quickly and can be used for almost any situation, even when attaching ceramic or titanium inserts. It’s also very cheap since you don’t need to attach the guide.
If you’re using epoxy, I recommend using a two-part epoxy that requires no mixing. This will give you the strongest bond possible.
I also like to use epoxy that has an added hardener, which helps it cure faster and makes it more durable.
There are many types of superglue and epoxy on the market, so you’ll have to do your research to find out which one is best for your situation.
Is There Any Way to Prevent My Guides from Popping Out Again in the Future?
There is no guaranteed way to prevent guides from popping out, but there are a few things you can do to minimize the chances.
First, try using a guide that is a size or two larger than the one you are replacing. This will help create a tighter fit in the rod blank and reduce the likelihood of the guide coming loose.
You should also make sure you have wiped down the area of your rod blank where you will be installing the guide with acetone, which removes any residue or oils that may interfere with how well the epoxy holds.
Don’t try to skimp on how much epoxy you use when gluing in a new guide. Instead, ensure the guide is well-coated and that you’ve given the epoxy enough time to cure before using your rod.
A good rule of thumb is to wait at least 24 hours before fishing with your rod after applying the epoxy.
If you follow these tips, you should be able to get a few trips out of your guides before they pop out again.
Conclusion
Now that you know how to replace your fishing rod guide inserts enjoy some great fishing.
Be sure to stock up on replacement inserts, so you’re always prepared when one of your guides snaps off. Finally, have fun and be safe while fishing.
